Schedule Appointment |

|

|

|
|
Schedule Appointment |
|
|

|
Schedule Appointment |
|
|
|
|
Schedule Appointment |
|
|
|
This is the working screen for the Appointment Calendar. By double-clicking on any empty time slot, you will see this screen. You may also click the "Add New Appointment" button on the left side of the Calendar to get to this screen. There are many powerful features loaded onto this screen. We suggest that you click the different features in the screen shot below to see how they work and learn the potential time-saving features available.
![]()
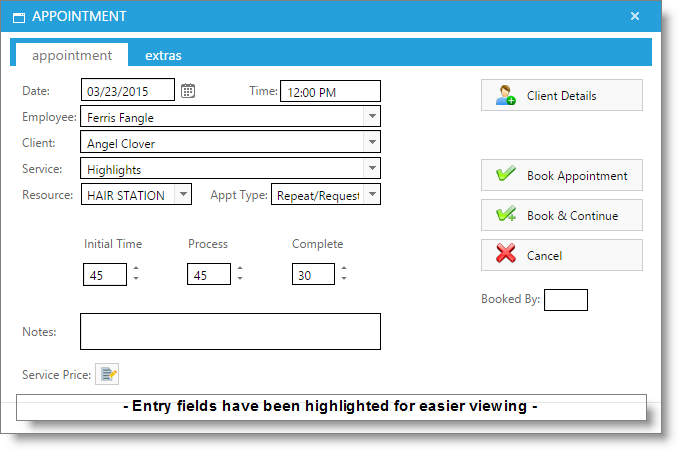
Appt Date/Time
If you double-clicked on top of a time slot on the Calendar to get to this screen, the date and time will be filled in automatically. You may change the date and time here if the client has changed their mind or if an incorrect time slot was selected.
Employee
If you double-clicked a time slot to get to this screen, the employee will be filled in automatically. If you chose to use the "New Appointment" option to schedule the appointment, select the employee that will perform this service by clicking the small drop down arrow and choose the employee from the drop down list.
![]()

Select a Client
The first step to scheduling an appointment is selecting a client. Start typing the first or last name of the client in the "Client" field to narrow down the search. Typing a name into this field will populate names into the "Client" field. If there are similar names in your Client List, the program will narrow down the search by every additional letter you enter. You may also click on the drop down arrow in the "Client" field to get a drop down list of clients that you can select from.
|
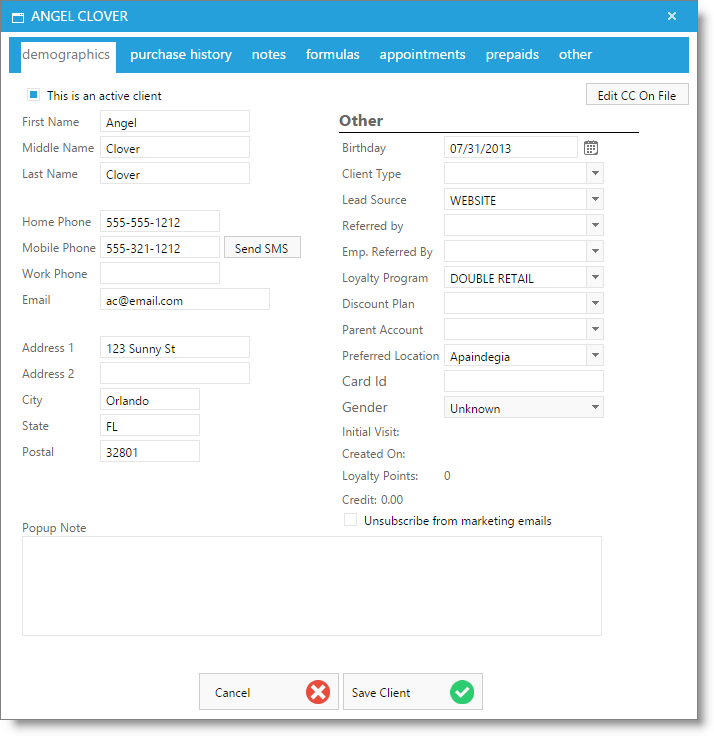
The following screen will open when you click the Add Client button on the "Schedule Appointment" screen in the calendar . Enter the information that the client provides and click the "Save Client" button. A client record will be created to store the clients data. This screen can also be accessed via the "Add Client" button at the top of the Sales Register when the client drop down is blank. |

Client Details
|
Click the Client Details button to instantly allow access to view and edit the selected client's information. |
This button will appear when a client is selected for booking, replacing the "Add Client" button. This is very useful for changing telephone numbers, address, etc. "On the Fly". You can also view purchase history, appointment history, and viewing / adding formulas . You can get to this screen from the Schedule Appointment screen or the Sales Register by clicking the "Client Details" button next to the client name.
Service
Click the drop down arrow to select the service that you are booking an appointment for from the drop drown menu. You can also start typing the name of the service into this field.
Qualified Services: The services displayed here will be the "Qualified Services" that were setup for the employee selected, if you have "Use qualified services when booking appointments" checked in your Company Settings. If you do not have this option checked in your Company Settings, all of your active services will be available from this drop down menu. |
Resource
If a resource (Manicure Station, Massage Room) is required for this service, click the drop down arrow to select the resource from the list. If you have selected a Resource Group applied to the service you have selected for this appointment, the resource will be automatically selected.
Appt Type
You may select the appointment type from this drop down menu.
Adjust Service Times
The three items in this area are the default times that you setup for this service in the Services list or the specific time that you have setup for each employee under their Qualified Services list in the Employee List. You can edit these times during booking, if needed.
• Init (Initial) Time
All service items need a time filled into this field. It is the best estimate of the time it takes to perform the service. Use 15-minute increments only. For example, 1 hour would be entered as 60, or a half hour would be entered as 30. For most service items this is the only time needed. For a chemical service, this would be the amount of time that it takes to apply the color or chemical to the hair.
• Process Time
Enter a time using 15 minute increments here if a delay is required during this service. For example, this would be necessary you apply color and must wait 30 minutes for processing time before you rinse and style. Entering a time here will allow you to schedule another service with a different client during this time. This allows you to maximize the use of the service provider's time. If you enter a time here, you must enter a "Completion Time".
• Completion Time
Enter a time here only if you entered a "Process" time above. This is the time it takes to finish the service after the delay.
Notes
Enter notes into this area if there is anything that you need to remember about this appointment or about this client. These notes will only be attached to this appointment. They will not show up on your client's next visit. These notes can be viewed when the hovering over the appointment.
Book Appointment
|
This button will save the information you have entered, close this screen and bring you back to the Calendar screen. |
Book & Continue
|
Click this button to book the first service. The schedule appointment screen will remain open with the same client, Employee and Date selected. The time will change to the next available time slot. All you will need to do to book an additional service is select the service, edit the service time if necessary, and select Book Appointment. |
Cancel Changes Button
|
Click this button to cancel any changes you have made and return to the Calendar screen. |
Booked By
Enter the initials of the employee booking the appointment. If you do not see this field available, it can be enabled in security profiles.
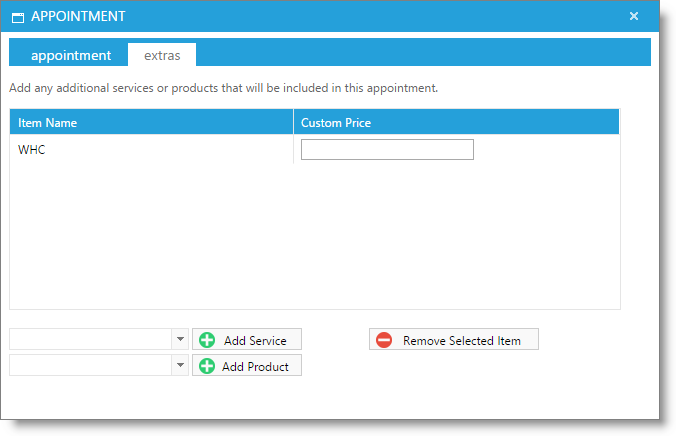
This tab allows you to attach any services or product to an appointment without taking additional time or booking another appointment. Anything listed here will transfer to the sales register when checking out the appointment.