
Sales Register (Point Of Sale) |

|

|

|
|
Sales Register (Point Of Sale) |
|
|

|
Sales Register (Point Of Sale) |
|
|
|
|
Sales Register (Point Of Sale) |
|
|
|
This is also one of the most used windows of the program. From here you sell every product including Gift Certificates.
The Sales Register can be open by selecting Sales from the Tool Bar and selecting Sales Register.
![]()
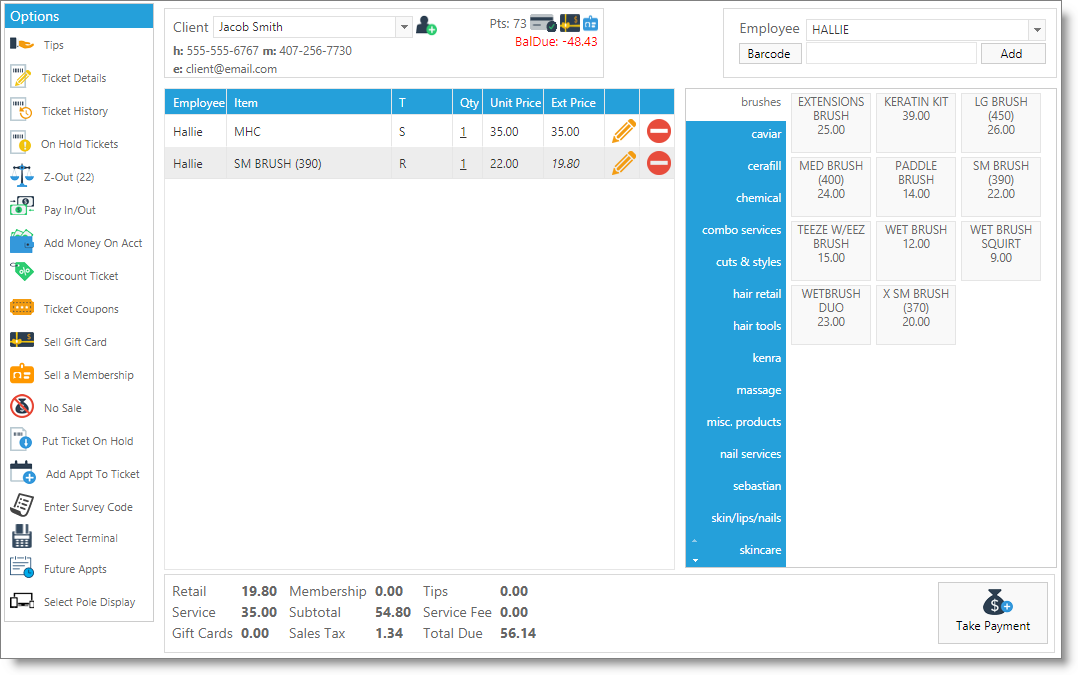
Selecting Client
The client must be selected for this invoice if you wish to have transaction history attached to their record.
Add Client
|
The following screen will open when you click the button next to the client name field. Enter the information that the client provides and click the "Save Client" button. A client record will be created to store the client's data. This screen can also be accessed via the Add Client button on the "Schedule Appointment" screen in the calendar. |
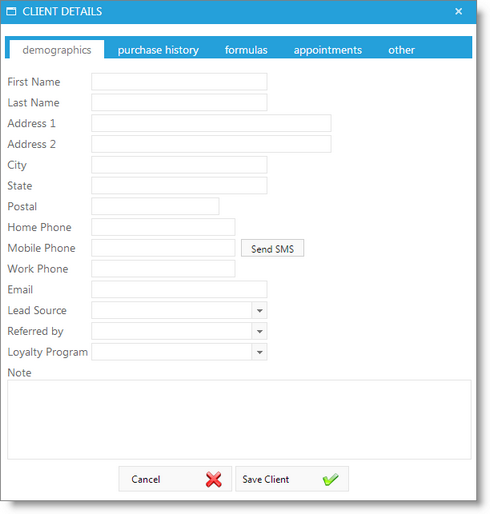
Client Details
|
When clicking the button next to the client name when a client is selected will instantly allow access to view and edit the selected client's information. You can also do this by clicking Client Details when a client has been selected in the "Schedule Appointment" screen. |
Employee Information
An Employee must be associated with each sale. This might only be the cashier, but the cashier must be selected. Since the program is sensitive to commissions, an employee is required. You may choose the "In House" employee for sales when an employee will not be receiving commission.
Click the drop down to select the employee from the listing of all the employees entered. You may also start typing the first characters of the Employee ID. As you type each letter, the search will instantly narrow down.
If an employee is not selected, the user that is currently logged in will be assigned to the sale.
![]()
Click the drop down button and select the product you wish to sell from the listing or use the search field to find the item. The button to the left of the item selection field can display either Item Id or Barcode. Clicking it will change the item search function to look up items via one of these two options:
| • | If the button displays "Item Id" you may start typing in the Item Id of the service or retail product you would like to select and the program will narrow down the search with each character you type in. |
| • | When the button displays "Barcode" you may scan the product's barcode when your cursor is blinking in this field. The product will automatically appear in the Invoice area. The Barcode search will also allow you to look up a coupon promo code. |
Department Selection
This list comes from the inventory departments. When departments are made and items are assigned, they will show in the space to the right.
Item Selection
Items belonging to the selected department to the left will display here. This section may be disabled in the Company Settings.
Invoice Listing
This area of the screen (below the Client Information area) lists all the items you have chosen for this sale. It also displays the quantity, price and employee assigned to the sale.
Quantity
Click over the Qty (quantity) field to edit the quantity of the item.
Remove Line Item
|
This button will remove the corresponding line item from the invoice listing. |
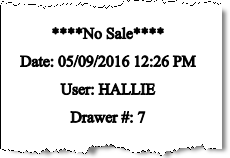
No Sale
Click this button to clear the invoice and return to a blank POS screen. If you are using a receipt printer, a receipt may print with a summary of the no sale performed.
Invoice Breakdown
This area of the screen (below the Invoice Listing) displays a detailed breakdown of the sale in progress. It instantly updates with changes you make.
